Greetings!
Follow this link to view Joe Marquez' use of MakeBeliefsComix to teach his middle school students about Newton's Laws of Motion:
http://educatorstudio.com/lessons/exploring-newtons-three-laws-motion-through-makebeliefscomix#comment-399
Follow this link to view Cynthia Madanski's great RILS lesson about using Strip Designer to Make Learning About Cell Organelles Fun:
http://educatorstudio.com/lessons/using-strip-designer-make-learning-about-cell-organelles-fun#comment-400
Both of these RILS plans are adaptable and 100% usable in my science classroom, making them very valuable to me.
Regards,
Paula
Wednesday, December 21, 2011
BP7B_RILS Plan
Greetings! Here is my RILS Plan.
Title: What’s in the Box, Goose? (From Granny Goose Potato Chips!)
Overview: Looking for an alternative way for your
students to demonstrate their understanding of new knowledge? Try Museum Box, a Web 2.0 tool that allows
your students to create a museum quality display of information. Allow your students to demonstrate their
knowledge and their creativity with Museum Box!
Target audience: 7th Grade Life
Science Students
Materials:
- Computers with Internet Access
- Web 2.0 tool: Museum Box
- Student Interactive notebooks containing notes, assignments, and activities from plant unit
- Blank paper for planning/sketching
Objectives: Given instruction and modeling, the student
will be able to apply their understanding of plants by constructing a Museum
Box of information. Students will use the six required topics for their museum
box project, evaluate their own information for applicability, following the
provided rubric , and create a project with at least 80% accuracy.
General for teacher: About a week before beginning this project,
go to http://museumbox.e2bn.org/creator/.
Create a teacher account, which will allow you to access all of your
student’s projects once they have created a login or password. You need to register your school, and it
takes a full week for them to complete the process. I created an example that
had 3 cubes in a drawer – only one of them was complete. I try not to always provide an example for
students, because I have a few who are more than happy to copy my example word
for word instead of creating their own. I’m allowing four class periods
(approx. 4 hours) of time to complete the planning and execution of the
project.
This
project would be appropriate as in a research venue, or as an assessment as I’m
using it here. It could also be used to
research a historical person or event, compile a collection of poetry or music,
or as an organizer for student artwork.
It’s use would be appropriate across the curriculum.
Procedure :
·
Introduce Project using example you’ve created.
Explain that students will be creating this project instead of taking a
standard assessment.
·
Explain specifics of assignment. Students will be creating a Museum Box like
the ones that curators in a museum store fossils, bones, gems, or artifacts
in. Students will be creating a
six-compartment virtual drawer. In each
drawer, there will be a cube, and on each side of the cube, a specific piece of
information. I challenge higher achieving students to create an 8-compartment
drawer with additional information of their choice.
·
Explain the information to be put on each
cube. Print out information for
students, or have students copy information into their notebooks.
General for students: (This applied to my 7th grade life
science students.) You will be using the information from all of Chapter 6 –
Introduction to Plants. You may use
information from your notebook and images you find online. You will not be copying from your
textbook. This is your opportunity to
demonstrate your knowledge on the following topics.
You
will need to go to the following website, and create a login and password. This is the only way you can build your
project and save it for future use. Go
to http://museumbox.e2bn.org/creator/.
Follow my verbal and visual instructions to create your login. (model,
using projector if possible, process of choosing school, creating login and
password.)
As
you build each cube to go into your Museum Box, you may put three images/drawings
on each cube, and the other three sides of each cube must contain factual
information. If you use images (photos)
other than the ones I provide for you (your perfect flower origami), you must
site your source. Copy and paste the URL
for pictures or diagrams you find online into the caption space on the cube’s
side.
Cube
1: 3 topics – The Perfect Flower, Bean
Seed Observations, and physical characteristics of plants.
Cube
2: Nonvascular Plants (seedless)
Cube
3: Vascular Plants (seedless)
Cube
4: Gymnosperms (seed bearing)
Cube
5: Angiosperms (seed bearing)
Cube
6: Seed Plant Structure
·
Share rubric/explain connection to assignment.
·
Choose groups of 3 students, or allow students
to self-select. (I allowed student to choose their own groups of three.
·
Seat students in proximity to one another in
computer lab, allowing them to communicate/collaborate on project.
·
Facilitate student work, using rubric as
standard.
·
Students peer-score projects, per rubric. Allow students time to improve (correct)
project before you score.
·
Students self and peer reflect, using provided
rubric.
·
Score student projects, per rubric.
Emerging Technology : Museum Box can be
used as an alternative assessment to determine student learning, or as a
research based project product.
Social Participation/Social Learning: Students
will begin by collaboratively planning what their project will look like. They will discuss, brainstorm, and plan what
information will be on each cube. Have
students fold a piece of blank paper into six squares, and plan what they will
put on each of six sides on a cube. They
will also determine who is responsible for which part of the information – 2
cubes per student? Two students act as
researchers and the third compiles the project?
Ensure that all group members have specific responsibilities. In groups
of three, students will work to complete the project.
Making Connections: Students have just completed a chapter
called, Introduction to Plants. Students
will utilize the new information they’ve gained to complete this task,
demonstrating their understanding of 6 topics.
Create/Produce: Students will create a 6-cube Museum Box,
following instructions provided.
Assessment:
Use rubric to plan, peer asses, improve, and final score projects.
Reflection: I’ve developed a peer-scoring rubric for
students to evaluate each other on preparation, focus, participation, and
interpersonal relations. Additionally,
students were asked to answer three reflection questions regarding their use of
Museum Box. My personal reflection will
involve evaluating student work, use of lab time to complete projects, and
after reading student responses, deciding whether this Web 2.0 tool was
beneficial in my student’s learning and in demonstrating their knowledge of the
topic.
BP7A_RILS_Videolink_and_Reflection
Greetings!
Here is the link to my RILS video. I thoroughly enjoyed working with my students to create their Museum Box projects!
Overall, I think using the Web 2.0 tool, Museum Box, was successful. The majority of my students were successful and enjoyed learning to use the new tool. There were a few students who would have rather just taken a test and gotten it over with, as they thought the project was just too much work. Students enjoyed working collaboratively, and commented that they learned better when they worked with others, that they learned more from others than when working by themselves, and that they enjoyed learning more about the topics than we had learned in class. Additionally, students were asked to peer score their partners on preparation, focus, participation, and interpersonal relations. On a scale of 1 to 4, most students scored themselves and their peers at the 3 and 4 range, and wrote critical comments for improvements in areas that they thought their peers could improve.
For my part, the only real hang up was the time required to set up a school account, and the timeline to get the project completed so I could get my project completed! I would use the tool again, possibly with my eighth grade physical science classes - possibly on a research project on our solar system.
Regards,
Paula
Saturday, December 10, 2011
PE5_Museum_Box
Again, greetings!
Using Museum Box has proven to be both rewarding and frustrating for me and my students. The rewarding part is that is turning out to be challenging for my students - they thought it would be easier and more fun than a standard assessment. They have discovered that planning and executing a quality project takes a lot of work, and although they have had fun, it certainly hasn't been easy! The frustration comes into play when work is lost because they'd forgotten to save it, when the site was down for a night when they were supposed to working on their projects from home, and when the computers in our lab just aren't cooperating. Also, I signed up for a teacher account well in advance (they recommend one week) and to date, it is still not established.
 This past Friday, my 7th graders spent 1st period in the computer lab, working in their groups of three, trying to complete their Museum Boxes on Plants. This meant they had spent four hours in their groups, planning and working on their project. Only two groups are largely finished, needing only to spell and grammar check, as well as making sure they've cited their sources. Here are a couple of screen shots from one of those groups:

 You can change the font you write with, the background color of the sides of your cubes, as well as the color of the box itself. This program had just enough choices for students - it wasn't like Power Point, which can often turn into a Power Pointless presentation with all of the sound effects and animations.This was straight forward and relatively easy for the students to learn and use.
Using Museum Box has proven to be both rewarding and frustrating for me and my students. The rewarding part is that is turning out to be challenging for my students - they thought it would be easier and more fun than a standard assessment. They have discovered that planning and executing a quality project takes a lot of work, and although they have had fun, it certainly hasn't been easy! The frustration comes into play when work is lost because they'd forgotten to save it, when the site was down for a night when they were supposed to working on their projects from home, and when the computers in our lab just aren't cooperating. Also, I signed up for a teacher account well in advance (they recommend one week) and to date, it is still not established.
 This past Friday, my 7th graders spent 1st period in the computer lab, working in their groups of three, trying to complete their Museum Boxes on Plants. This meant they had spent four hours in their groups, planning and working on their project. Only two groups are largely finished, needing only to spell and grammar check, as well as making sure they've cited their sources. Here are a couple of screen shots from one of those groups:
The drawer above is complete. Each cube in the drawer contains information about a specific assigned topic, and students selected information from their notebooks to include as text. They were required to cite sources of pictures or additional text information.

This image shows one of the cubes from the drawer expanded to show the data included. When you click on the face that you want to see (from the left side) the cube rolls to show the side you've chosen. You can see the citation for this image in the caption box beneath the photo. It's a simple cut and paste to add the citations.
 You can change the font you write with, the background color of the sides of your cubes, as well as the color of the box itself. This program had just enough choices for students - it wasn't like Power Point, which can often turn into a Power Pointless presentation with all of the sound effects and animations.This was straight forward and relatively easy for the students to learn and use.
The Museum Box website has a gallery of student work - it has the spectrum of quality you'd expect. There are a few good projects posted, though. My students discovered the gallery on Friday, and enjoyed looking at other student's work.
I had students complete a self and peer evaluation on Friday at the end of class. I asked them to score each other on things like preparation, focus, participation, and interpersonal relations. Additionally, I asked them to respond to three questions. Those questions and some responses:
1. Do you think the Museum Box is a good way to demonstrate your understanding of a topic? Yes, No, and why?
Largely, students answered "yes", and said things like they liked using the computer to create the project,they liked working with partners, they enjoyed doing the additional research and learning more. Students who said "no" said things like they felt funny not studying for a test, the program was hard to use because it didn't always save things.
2. Is doing a project like this preferable (better than) to taking a standard test? Yes, No, and why?
Again, largely "yes". Some responses were yes, because projects were more interesting, projects last a week instead of one class period, and one student said they learned more when they got to work with partners. "No" responses were accompanied with explanations like no, because these take longer than tests, I don't like working with partners, projects are boring and too hard.
3. Did you enjoy learning how to use this tool? Will you use it again if given a choice?
Once again, largely "yes". Students said they enjoyed learning how to use a new Web 2.0 tool, even though it had its challenges. One student asked if I'd tell his other teachers about the program so they could use it in more classes. Students who said "no" said they didn't like having to work so hard to learn something new, and that they would rather make a poster or more traditional project.
Overall, even with the technological challenges, I think Museum Box is a great Web 2.0 tool. I think it could be applied across all disciplines for a variety of reasons. Check out my previous blog for a link to the Museum Box site, and for a youtube video about the tool.
Regards,
Paula
Thursday, December 8, 2011
PE4_Museum_Box
Greetings!
I blogged a week or so about a great Web 2.0 tool, Museum Box. This tool allows you to create a museum-like drawer, filled with cubes of information. I chose to use this tool for my RILS project because I thought it was a great alternative assessment to offer my 7th grade Life Science students.
Here's a link to the site - it's user friendly. You have to create a login and password, and it is easiest to use if you register your school. That way, all of your students accounts are accessible to you for grading. On the site, they state that it can take up to a week for your account to be created...something I did not notice early on. It's been a week, and I still have no teacher access to my students. However, my students are doing great things with this tool. So check out the site and the youtube video...
http://www.museumbox.e2bn.org
http://www.youtube.com/watch?v=U6fDRktWIGg
 My students had just finished a unit on "plants", so I thought this would be a great way for them to show their understanding of the topics we'd covered. I created a lesson where they'd build a drawer which held 6 cubes. Each cube had a specific topic assigned to it, and each cube could have 3 images or illustrations or photos, and the other 3 sides of the cube had to have text - information about the topic. I made an example with three cubes, just so they'd have an idea of what it looked like when completed.


This screen shows you an "exploded" cube, with all faces visible. My students have gotten really good at manipulating images, citing the sources in the caption spot under the image, and sharing their information amongst team members.
We're shooting for a deadline of tomorrow by the end of the class period. I will, in my next post, link to completed projects so you can see just how clever and talented and exceptional my students are.
Regards,
Paula
Sunday, December 4, 2011
BP6
Hello again! Please follow this link to see Julia's review of a unique art portfolio tool called CarbonMade!
http://thedigitalclouds.blogspot.com/2011/12/pe3imovie.html?showComment=1323058133594#c878473281590614612
Thanks
Paula
http://thedigitalclouds.blogspot.com/2011/12/pe3imovie.html?showComment=1323058133594#c878473281590614612
Thanks
Paula
BP5
Hi All! Follow this link to my classmate, DD Jeter's, blog. She's highlighting a great Web 2.0 tool called Story Jumper, which allows students to create their own storybooks.
http://msdedej.blogspot.com/2011/12/bp4.html?showComment=1323057642970#c82110672225613332
Regards,
Paula
http://msdedej.blogspot.com/2011/12/bp4.html?showComment=1323057642970#c82110672225613332
Regards,
Paula
BP4_Museum_Creator
Greetings!
I was struggling to find another tool that I thought I would really "use" in my classroom. I found the tool, Museum Box. The tool is free, and very adaptable for a variety of uses. If you think about museums, these trays are the drawers that might hold gems, fossils, or bones of prehistoric creatures. From the posted examples, it looks like a great tool to do a biography, but I intend to use it as an assessment tool for a Life Science Unit on plants.

In Museum Box, students create "cubes" of information by creating or finding information, affixing it to the sides of cubes, and then placing those cubes in a labeled tray. You can select the number of spaces in the tray, and hence, the number of cubes. You can add text, images, sounds, video, or music to your cube, making each cube a unique museum archive. Given a rubric, I can see this as a great visual, paperless assessment for what students have learned in a unit.

I created an example Museum Box, using images I found online. I made one cube for information on Bean Seeds. My students sprouted pinto beans and observed the seeds/plants for three weeks. They have detailed drawings to include. The second cube would be about plant structure and function, while the third cube gets into Angiosperms. Additional topics: Photosynthesis, Gymnosperms, Mosses, etc. You have to create an online account to save your project, but it doesn't ask for anything more than a login and password. You can sign up as a school, and it would be great if the teacher can then access all students' projects, but I need to do some further experimentation to see if that's the case.

The tool seems pretty easy to use, and I can see it being a great option for projects and/or alternative assessments.
Regards,
Paula
Saturday, December 3, 2011
PE3_iMovie
The last third of the iMovie tutorial on Lynda.com is probably the one I will refer back to time and time again. It covered topics including working with audio, music, and voiceovers, as well as all kinds of methods for sharing movies.


The tools for adding, editing, and manipulating sounds and music are very user friendly - moving a bar up and down to adjust volume on a clip or an entire project? It doesn't get any easier than that! I also think the built in options for ambient sounds, jingles, and music are awesome - it saves time and you don't have to worry about copyright issues.
I am also going to reference the "sharing" section of the tutorial frequently - I don't use Facebook or Twitter, so sharing video is all new to me. I don't do it often enough to remember how to easily do it, so it's great to know where the instructions are.
The sharing option that I will use is sharing my videos and photos to my Mobile Me Gallery. Mobile Me hosts photo and web galleries for subscribers, but you can sign up for a 60 day free trial to check it out. Once you set up the capability for your MAC to utilize Mobile Me, you can share your videos and photos with only people you allow, or with anyone. You can also choose to allow people to download your pictures and videos, or not. I will be curious to see how this application interphases with my phone!
Regards,
Paula
PE2_iMovie
The second third of this series of videos was definitely more interesting and informative than the first. Again, clear, concise examples are presented, the pace of delivered information is comfortable, and the narrator just makes you feel like, "you can do it!".

Topics in this section included fine tuning clips, splitting and cropping clips, more information on using advanced editing tools, working with effects and colors, using transitions, and adding titles and text to your project. Of all of the topics, using transitions and adding titles were the most informative. They were the things I've struggled most with when making iMovies.
Now that I've watched the video, making transitions between video clips or between clips and still photos seems awfully easy. There are many pre-made transitions that you just drag and drop into your project. You can choose to use the same transition throughout your movie, or change between clips. You can even adjust the duration of the transition, which I found to be pretty cool.

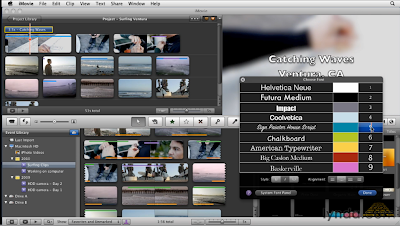 I'm embarrassed to admit that the other thing I really struggled with was adding a title and credits to my projects, so much so, that most of them didn't have either. Again, now that I've watched the video, I think the quality of my productions will improve drastically. You may even get to know the topic of my movie and who the stars were!
PE1_iMovie
The Lynda.com iMovie video tutorials are clear, well organized, and informational! I appreciate the pace and the visuals that really help me understand how to use the various tools.
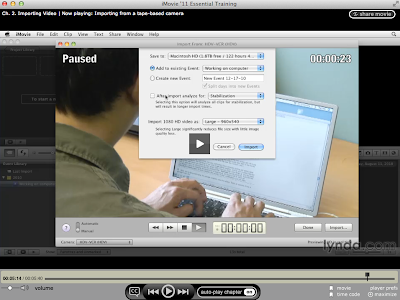
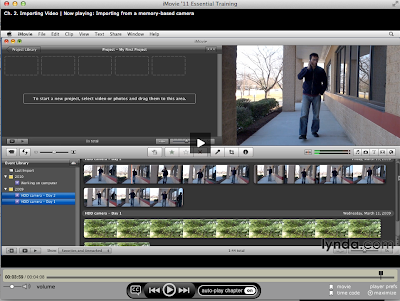
Initially, the video tells how to check for iMovie software updates, and how to import video from a variety of sources. I struggled early in this program to use iMovie to complete assignments, and would have benefited from this tutorial earlier! I had difficulty importing pictures from my iPhone, and when they did import, I couldn't figure out how to get them into a place where I could work with them. The most useful thing I learned from this section was how to import still photos or movies, either from a tapeless camera, or from a digital still camera (like an iPhone), and how to get them into iMovie for use.
The most useful information of all was the section detailing how to organize, rate, mark, and tag your events, or video clips. Again, with initial assignments, I really struggled, but through trial and error, eventually figured out how to edit video clips to create a joint presentation.
When rating and tagging clips, using iMovie preferences advanced tools option makes organizing your events really easy. I went into my mess of events and successfully began organizing. (I put many clips into the trash!) Although I can't, at the moment, find a reason to use something like "people finder", I do see the value in these organizational tools in general.

Regards,
Paula

Initially, the video tells how to check for iMovie software updates, and how to import video from a variety of sources. I struggled early in this program to use iMovie to complete assignments, and would have benefited from this tutorial earlier! I had difficulty importing pictures from my iPhone, and when they did import, I couldn't figure out how to get them into a place where I could work with them. The most useful thing I learned from this section was how to import still photos or movies, either from a tapeless camera, or from a digital still camera (like an iPhone), and how to get them into iMovie for use.

The most useful information of all was the section detailing how to organize, rate, mark, and tag your events, or video clips. Again, with initial assignments, I really struggled, but through trial and error, eventually figured out how to edit video clips to create a joint presentation.
When rating and tagging clips, using iMovie preferences advanced tools option makes organizing your events really easy. I went into my mess of events and successfully began organizing. (I put many clips into the trash!) Although I can't, at the moment, find a reason to use something like "people finder", I do see the value in these organizational tools in general.

Regards,
Paula
Tuesday, November 29, 2011
BP3_Dipidy
I chose to review a Web 2.0 tool called Dipidy. Dipidy is a site with both a free and a paid version, which allows users to create timelines. After searching through what seemed to be hundreds of 2.0 Apps, I found this one, which may have a place in my instruction of students.

Dipidy has a large number of pre made timelines, ranging from the escapades of Madonna to the accomplishments of Steve Jobs. The timelines are attractive, seemingly unbiased, and interesting. You can search for timelines by topic, which makes the site very user friendly.

You can also create your own timelines on Dipidy. You can opt to create them from scratch with entirely your own information, or you can put events into a timeline, and support them with information from pre made timelines by incorporating them into your existing one.
I think the coolest part of the timelines is that they are interactive. You can click on one of your entries to obtain a video, a news article, a link to another timeline, etc. Of course, the timeline is only as "good" as the information you find to put into it.

I found that creating my own timeline was very interesting - not very involved initially. Finding appropriate, copy write free photos, videos, and articles, however, was very time consuming. As I worked on adding events to an existing timeline on the history of atom exploration, I spent way too much time looking for appropriate and available photos and videos. I ended up adding only one event, the latest launch of the Mars Rover on November 28, 2011, to an existing timeline.

I can see great uses for this tool. As a science and technology teacher, I would like to incorporate more history of the people involved in innovation and invention. I would love to have time to develop timelines appropriate for physics, life science, engineering, etc., to use in my classes. I think the interactive feature would hold my student's attention better than a Power Point presentation of information. If the timeline was available on line, I could assign it's viewing as homework. Overall, given time to work on the presentations, this is an awesome tool.
Sunday, November 27, 2011
BP2_iGoogle PLE
My iGoogle page looks like this:

My homepage, above, contains fall scenery because it reminds me of where I was born - Wisconsin. I have never seen more beautiful fall colors anywhere! It contains Facebook (my page in under construction) and Twitter gadgets, as well as a local weather link. I have a clock and calendar gadget, as well as link to my google calendar. I also have a CNN link, and a link to my Gmail account. Lastly, I have a gadget to Epicurious, because for some reason, thinking about what I'm making for dinner kind of motivates me to finish my assignments!


On my second FSO/AR tab, above, I have links to my Google features and additional Email accounts. I also have valuable AR links for easy accessibility when working on my Literature Review paper.

On my last Resources tab, I have Google Reader, my ETC resources table of links, my Lynda.com Training table of links, a Viddler gadget, so I can stay current on any updates to Viddler, and a Daily English Study gadget, which I'm planning to use with my ELL students to strengthen their learning of English.
I think this PLE will be useful in my quest to remain organized!
Tuesday, November 22, 2011
BPI-Welcome to my blog!
 |
| The Survivor! |
When I look at this Blue Agave Cactus, I see a survivor. It came, as a 4 inch tall plant, from a neighbor who was "weeding" it from his garden. My husband brought it home, we planted it about a year ago, and now it's nearly 2 feet tall, sprouting babies of it's own.
How does this relate to me? I want to be like the Agave! I want to grow as I journey through my Master's program at Full Sail University. I am challenged and excited by the new learning I am experiencing, even though it may often take me a few attempts to get it right. I want to be able to say to my children and students, "Look at what I've been able to accomplish!"
In this program, I am being challenged to step outside of my comfort zone and explore my unexplored learning styles. This blog is an example of that. I have never willingly read any blogs, and certainly didn't think I'd be creating one! Other challenges have included working in groups to accomplish tasks - yes, I am one of those people who prefers to work independently, but have actually enjoyed the collaboration, feedback, and support of my peers.
Subscribe to:
Posts (Atom)